A summary of API Design for C++ - Martin Reddy (part 2)
The design patterns for C++ APIs
Patterns
This chapter concentrates on design patterns that are of particular importance to the design of high-quality APIs and discuss their practical implementation in C++.
Pimpl idiom
“Pointer to implementation” or “pImpl” is a C++ programming technique that removes implementation details of a class from its object representation by placing them in a separate class, accessed through an opaque pointer.
This mechanism helps maintain a strong separation between API’s interface and implementation. However, Pimpl is not strictly a design pattern, it can be considered a special case of Bridge design pattern.
Design the pimpl class
Consider following example:
// autotimer.h
#ifdef _WIN32
#include <windows.h>
#else
#include <sys/time.h>
#endif
#include <string>

class AutoTimer
{
public:
    /// Create a new timer object with a human-readable name
    explicit AutoTimer(const std::string &name);
    /// On destruction, the timer reports how long it was alive
    ~AutoTimer();

private:
    // Return how long the object has been alive
    double GetElapsed() const;
    std::string mName;
#ifdef _WIN32
    DWORD mStartTime;
#else
    struct timeval mStartTime;
#endif
};
This API violates some important qualities presented in the previous part, including the exposing of platform-specific defines in the header file. However, C++ requires to declare private member in the header file so that we cannot avoid including the platform-specific #if directives.
Pimpl idiom could come to rescue here by placing all the private members into a class (or struct) that is forward declared in the header but defined in the .cpp file.
// autotimer.h
#include <string>
class AutoTimer
{
public:
    explicit AutoTimer(const std::string &name);
    ~AutoTimer();
private:
    class Impl;
    Impl *mImpl;
};
Now, the API is much cleaner. There are no platform-specific preprocessor directives, and the user cannot see any of the class’s private members by looking at the header file. The .cpp file now looks a little bit messy due to the platform-specific #ifdef but the point is that this messiness is completely hidden from users.
// autotimer.cpp
#include "autotimer.h"
#include <iostream>
#if _WIN32
#include <windows.h>
#else
#include <sys/time.h>
#endif
class AutoTimer::Impl
{
public:
    double GetElapsed() const
    {
#ifdef _WIN32
    return (GetTickCount() - mStartTime) / 1e3;
#else
    struct timeval end_time;
    gettimeofday(&end_time, NULL);
    double t1 = mStartTime.tv_usec / 1e6 + mStartTime.tv_sec;
    double t2 = end_time.tv_usec / 1e6 + end_time.tv_sec;
    return t2 - t1;
#endif
    }
    std::string mName;
#ifdef _WIN32
    DWORD mStartTime;
#else
    struct timeval mStartTime;
#endif
};
AutoTimer::AutoTimer(const std::string &name) :
    mImpl(new AutoTimer::Impl())
{
    mImpl->mName = name;
#ifdef _WIN32
    mImpl->mStartTime = GetTickCount();
#else
    gettimeofday(&mImpl->mStartTime, NULL);
#endif
}
AutoTimer::~AutoTimer()
{
    std::cout << mImpl->mName << ": took " << mImpl->GetElapsed()
        << " secs" << std::endl;
    delete mImpl;
    mImpl = NULL;
}
In the above example, the Impl class is a private nested class within the AutoTimer class. Declaring it as private helps avoid polluting the global namespace and the public API of the class. However, the limitation of this approach is that only methods of AutoTimer can access members of the Impl. We could make it public if other classes or free functions in the .cpp must access the Impl members. For example:
// autotimer.h
class AutoTimer
{
public:
    explicit AutoTimer(const std::string &name);
    ~AutoTimer();
    // allow access from other classes/functions in autotimer.cpp
    class Impl;
private:
    Impl *mImpl;
};
Another design question worth considering is how much logic to locate in the Impl class. Some options include:
- Only private member variables
- Private member variables and methods
- All methods of the public class, such that the public methods are simply thin wrappers on top of equivalent methods in the
Implclass.
Each of the above options may be appropriate under different circumstances. However, option 2 is preferred in general.
A couple of caveats with this approach (Herb Sutter, 1999):
-
Virtual methods can’t be hidden in the implementation class. These must appear in the public class so that any derived classes are able to override them.
-
You may need to add a pointer in the implementation class back to the public class so that the Impl class can call public methods. Although you could also pass the public class into the implementation class methods that need it.
Copy semantics
A C ++ compiler will create a copy constructor and assignment operator for your class if you don’t explicitly define them. However, these default constructors will only perform a shallow copy of your object. This is bad for pimpled classes because it means that if a client copies your object then both objects will point to the same implementation object, Impl . However, both objects will attempt to delete this same Impl object in their destructors, which will most likely lead to a crash. Two options for dealing with this are as follow.
- Make your class uncopyable: You can do it by explicitly declare a copy constructor and assignment operator in the header file. You don’t have to provide implementations for these. This will give a link error if any code try to copy them. Alternatively, you could declare them as private, which will give a compile error instead.
#include <string>
class AutoTimer
{
public:
  explicit AutoTimer(const std::string &name);
  ~AutoTimer();
private:
  // Make this object be non-copyable
  AutoTimer(const AutoTimer &);
  const AutoTimer &operator =(const AutoTimer &);
  class Impl;
  Impl *mImpl;
};
In C++11, you could explicitly forbid it:
AutoTimer(const AutoTimer &) = delete; - Explicitly define the copy semantics: If you do want your users to be able to copy your pimpled objects, then you should declare and define your own copy constructor and assignment operator. These can then perform a deep copy of your object, that is, create a copy of the Impl object instead of just copying the pointer.
Smart pointers
One of the inconvenient and error-prone aspects of pimpl is the need to allocate and deallocate the implementation object. Every now and then you may forget to delete the object in your destructor or you may introduce bugs by accessing the Impl object before you’ve allocated it or after you’ve destroyed it. As a convention, you should therefore ensure that the very first thing your constructor does is to allocate the Impl object (preferably via its initialization list), and the very last thing your destructor does is to delete it.
Think about the copy semantics of your pimpl classes and consider using a smart pointer to manage the initialization and destruction of the implementation pointer.
Advantages of Pimpl
-
Information hiding: private members are now completely hidden from your public interface. This also makes your public header files are cleaners and more clear to users.
-
Reduce coupling: as shown in the example, the dependencies of the header on those files
windows.handsys/time.hcould increase the compile-time coupling of your API on other parts of the system. Using pimpl, you can move those dependencies into the.cppfile and remove those elements of coupling. -
Faster compiles: Another implication of moving implementation-specific includes to the
.cppfile is that the include hierarchy of your API is reduced. This can have a very direct effect on compile times. -
Greater binary compatibility: The size of a pimpled object never changes because your object is always the size of a single pointer. Any changes you make to private member variables will only affect the size of the implementation class that is hidden inside of the
.cppfile. This makes it possible to make major implementation changes without changing the binary representation of your object. -
Lazy allocation: The
mImplclass can be constructed on demand. This may be useful if the class allocates limited or costly resources such as a network connection.
Disadvantages of pimpl
- Allocate and free an additional implementation object.
- Extra developer inconvenience to prefix all private member accesses with something like
mImpl->. This can make the implementation code harder to read and debug due to the additional layer of abstraction. This becomes even more complicated when the Impl class has a pointer back to the public class. You must also remember to define a copy constructor or disable copying of the class. However, these inconveniences are not exposed to users of your API and are therefore not a concern from the point of view of your API’s design. They are a burden that you the developer must shoulder in order that all of your users receive a cleaner and more efficient API. To quote a certain science officer and his captain: “The needs of the many outweigh the needs of the few. Or the one.” - The compiler will no longer catch changes to member variables
within const methods. This is because member variables now live in a separate object. Your compiler will only check that you don’t change the value of the
mImplpointer in a const method, but not whether you change any members pointed to bymImpl.
Singleton
The Singleton design pattern is used to ensure that a class only ever has one instance. The pattern also provides a global point of access to that single instance.
Singleton could be seen as a more elegant global variable, however offer some advantages such as:
- One instance of the class can be created.
- Provides control over the allocation and destruction of the object.
- Thread-safe access to the object’s global state.
- Avoids polluting the global namespace.
The Singleton pattern is useful for modeling resources that are inherently singular in nature. Some example use cases:
- A class access to the system clock, the global clipboard, or the keyboard.
- Manager classes that provide a single point of access to multiple resources such as a thread manager or an event manager.
Since Singleton is still essentially a way to add global variables to your system, it therefore can have some drawbacks:
- Introduce global state and dependencies into your API that are difficult to refactor later.
- Make it difficult to write unit test that exercise isolated parts of your code.
A Singleton is a more elegant way to maintain global state, but you should always question whether you need global state.
Implementing Singleton in C++
The Singleton pattern is basically creating a class with a static method that returns the same instance of the class every time it is called. This static method is often called GetInstance(), or similar. Besides that, there are some features to consider when designing a singleton class:
- We don’t want client to be able to create new instances –> declaring the default constructor to be private.
- We want the singleton to be non-copyable, to enforce that the second instance cannot be created –> declaring a private copy constructor and a private assignment operator.
- Prevent clients from being able to delete the singleton instance –> declaring the destructor to be private.
- The
GetInstance()method could return either a pointer or a reference to the singleton class. However, client could potentially delete the object –> Prefer returning a reference to returning a pointer.
The general form of a singleton in C++ can therefore be given as follows:
class Singleton
{
public:
    static Singleton &GetInstance();
private:
    Singleton();
    ~Singleton();
    Singleton(const Singleton &);
    const Singleton &operator =(const Singleton &);
};
The user code can request a reference to the singleton class as follows:
Singleton &obj = Singleton::GetInstance();
The next question is where should the singleton instance be initialized. One thing to note that it would be dangerous to initialized the singleton using a non-local static variable. A non-local object is one that is declared outside of a function.
One way to initialize the singleton:
Singleton &Singleton::GetInstance()
{
    static Singleton instance;
    return instance;
}
The plus point of this method is that the instance will only be allocated when the GetInstance() method is first called. However, this approach is not thread-safe.
Making Singletons thread-safe
The most straightforward approach to make the GetInstance() thread-safe is to add a mutex lock:
Singleton &Singleton::GetInstance()
{
    Mutex mutex;
    ScopedLock(&mutex); // unlocks mutex on function exit
    static Singleton instance;
    return instance;
}
The potential problem with this solution is that it may be expensive because the lock will be acquired every time the method is called. However, it might not be a performance issue if it is not called too often in your application. Always measure performance in real-world uses before deciding to optimize.
A solution to mitigate the above issue is to use the Double Check Locking Pattern (DCLP), which looks like:
Singleton &Singleton::GetInstance()
{
    static Singleton *instance = NULL;
    if (! instance)
    // check #1
    {
        Mutex mutex;
        ScopedLock(&mutex);
        if (! instance) // check #2
        {
            instance = new Singleton();
        }
    }
    return *instance;
}
However, DCLP is not guaranteed to work with all compilers and under all processor memory models.
If the performance of a thread-safe GetInstance() is critical, we could avoid the lazy instantiation model and initialized the singleton on startup, i.e. in constructor. Two options in this approach are:
- Static initialization: Static initializers get called before
main(). The following static initialization call could be added to thesingleton.cpp:static Singleton &foo = Singleton::GetInstance(); - Explicit API initialization: the singleton could be initialized as part of this library initialization routine. We could add a function for initializing it.
void APIInitialize()
{
 Mutex mutex;
 ScopedLock(&mutex);
 Singleton::GetInstance();
}
Creating a thread-safe Singleton in C ++ is hard. Consider initializing it with a static constructor or an API initialization function.
Singleton vs Dependency Injection
Dependency injection is a technique where an object is passed into a class (injected) instead of having the class create and store the object itself.
For example:
class MyClass
{
    MyClass(Database *db) :
        mDatabase(db)
    {}
private:
    Database *mDatabase;
};
The db object in the example is created outside of MyClass and is passed to the class.
Dependency Injection can therefore be viewed as a way to avoid the proliereation of singletons by encouraging interfaces that accept the single instance as an input rather than requesting it internally via a GetInstance(). This also makes more testable interfaces.
Singleton vs Monostate
A monostate is a “conceptual singleton” - all data members of a monostate are static, so all instances of the monostate use the same (static) data. For instance:
// monostate.h
class Monostate
{
public:
    int GetTheAnswer() const { return sAnswer; }
private:
    static int sAnswer;
};

// monostate.cpp
int Monostate::sAnswer = 42;
In this example, multiple instances of the Monostate class could be created but all calls to the GetTheAnswer() method will return the same result because all instances share the same static variable.
You could consider to use Monostate instead of Singleton pattern when:
- You don’t need to control when the state is initialized.
- You don’t need to store state in the Singleton object itself (read-only object).
As Robert C. Martin notes, Singleton enforces the structure of singularity by only allowing one instance to be created, whereas Monostate enforces the behavior of singularity by sharing the same data for all instances.
Disadvantages of Monostate:
- You cannot subclass any of the static methods because static member function cannot be virtual.
- Since the class can’t be instantiated (represent by instance), you cannot not write a constructor or destructor to perform any initialization or cleanup but provide a static method to do it. In this case, the thread-safe concern raised in the Singleton pattern would be applicable.
Think twice before using Singleton
In a recent retrospective interview, authors of the original design patterns book stated that the only pattern they would consider removing from the original list is Singleton. This is because it is essentially a way to store global data and tends to be an indicator of poor design (Gamma et al., 2009).
Therefore, as a final note on the topic of singletons, I urge you to really think about whether a singleton is the correct pattern for your needs. It’s often easy to think that you will only ever need a single instance of a given class. However, requirements change and code evolves, and in the future you may find that you need to support multiple instances of the class.
For example, consider that you are writing a simple text editor. You use a singleton to hold the current text style (e.g., bold, italics, underlined) because the user can only ever have one style active at one time. However, this restriction is only valid because of the initial assumption that the program can edit only one document at a time. In a later version of the program, you are asked to add support for multiple documents, each with their own current text style. Now you have to refactor your code to remove the singleton. Ultimately, singletons should only be used to model objects that are truly singular in their nature. For example, because there is only one system clipboard, it may still be reasonable to model the clipboard for the text editor as a singleton.
Factory
A Factory Method is a creational design pattern that allows you to create objects without having to specify C++ type of the object to create. In essence, a factory method is a generalization of a constructor.
First, let’s look at the limitation of constructors in C++:
- No return result: you cannot return anything from a constructor.
- Constrained naming: A constructor must have the same name as the class it lives on. You cannot have two constructors in different name with the same set of arguments. This limit its flexibility.
- Statically bound creation: The name of the class must be known at the compile time when constructing an object. There is no concept of dynamic binding at run time for constructors in C++.
- No virtual constructor: You cannot declare a virtual constructor in C++. You must specify the exact type of the object to be constructed at compile time. The compiler therefore allocates the memory for that specific type.
Factory methods circumvent all of these limitations.
There are several ways to implement this pattern such as inheritance or Abstract Base Classes (ABC). Here, we will focus on abstract base class case.
Abstract base classes: is a class that contains one or more pure virtual member functions. Methods with implementations can also be provided in the ABC; not all of the methods have to be pure virtual.
Example for an ABC:
// renderer.h
#include <string>
class IRenderer
{
public:
    virtual ~IRenderer() {}
    virtual bool LoadScene(const std::string &filename) = 0;
    virtual void SetViewportSize(int w, int h) = 0;
    virtual void SetCameraPosition(double x, double y, double z) = 0;
    virtual void SetLookAt(double x, double y, double z) = 0;
    virtual void Render() = 0;
};
You should always declare the destructor of an abstract base class to be virtual. The following code illustrates why this is important.
class IRenderer
{
    // no virtual destructor declared
    virtual void Render() = 0;
};

class RayTracer : public IRenderer
{
    RayTracer();
    ~RayTracer();
    void Render(); // provide implementation for ABC method
};
int main(int, char **)
{
    IRenderer *r = new RayTracer();
    // delete calls IRenderer::~IRenderer, not RayTracer::~RayTracer
    delete r;
}
Simple factory example
Continue with the above example, we could declare the factory for object type IRenderer as follows:
// rendererfactory.h
#include "renderer.h"
#include <string>
class RendererFactory
{
    public:
    IRenderer *CreateRenderer(const std::string &type);
};
Let’s assume that you have implemented three concrete classes derived from IRenderer: OpenGLRenderer, DirectXRenderer, MesaRenderer. Also, you don’t want your users of your API have any knowledge of the existence of these types, they must be completely hidden behind the API. The client may only has the access to the header file of IRenderer.
The implementation of the factory method as follows:
// rendererfactory.cpp
#include "rendererfactory.h"
#include "openglrenderer.h"
#include "directxrenderer.h"
#include "mesarenderer.h"
IRenderer *RendererFactory::CreateRenderer(const std::string &type)
{
    if (type == "opengl")
        return new OpenGLRenderer();
    if (type == "directx")
        return new DirectXRenderer();
    if (type == "mesa")
        return new MesaRenderer();
    return NULL;
}
This factory method can therefore return any of the three derived classes of IRenderer, depending on the type string that the client passes in.
One potential drawback is that the factory method contains hardcoded knowledge of the available derived classes. If you add a new renderer to the system, you have to edit rendererfactory.cpp which is hidden in the API. Moreover, this means that you cannot add new support for new derived classes at run time. More specifically, users cannot add new renderers to the system.
Extensible factory example
To decouple the concerete derived classes from the factory method and to allow new derived classes to be added at run time, you can update the factory class to maintain a map that associates type names to object creation callbacks. You can then allow new derived classes to be registered and unregistered using a couple of new method calls. The ability to register new classes at run time allows this form of the Factory Method pattern to be used to create extensible plugin interfaces for your API.
One issue with this extended method is that the factory object must now hold state (keep referece to new derived classes added at run time). This is the reason why most factory objects are also singletons. In the interests of simplicity, however, the following example will use static methods and variables instead of singleton.
// rendererfactory.h
#include "renderer.h"
#include <string>
#include <map>
class RendererFactory
{
public:
    typedef IRenderer *(*CreateCallback)();
    static void RegisterRenderer(const std::string &type, CreateCallback cb);
    static void UnregisterRenderer(const std::string &type);
    static IRenderer *CreateRenderer(const std::string &type);

private:
    typedef std::map<std::string, CreateCallback> CallbackMap;
    static CallbackMap mRenderers;
};


// rendererfactory.cpp
#include "rendererfactory.h"
// instantiate the static variable in RendererFactory
RendererFactory::CallbackMap RendererFactory::mRenderers;
void RendererFactory::RegisterRenderer(const std::string &type, CreateCallback cb)
{
    mRenderers[type] = cb;
}

void RendererFactory::UnregisterRenderer(const std::string &type)
{
    mRenderers.erase(type);
}

IRenderer *RendererFactory::CreateRenderer(const std::string &type)
{
    CallbackMap::iterator it = mRenderers.find(type);
    if (it != mRenderers.end())
    {
        // call the creation callback to construct this derived type
        return (it->second)();
    }
    return NULL;
}
A user of the API can now register (and unregister) new renderers in your system. The following code shows how a user could define their own renderer, register it with the object factory, and then ask the factory to create an instance of it.
class UserRenderer : public IRenderer
{
    public:
    ~UserRenderer() {}
    bool LoadScene(const std::string &filename) { return true; }
    void SetViewportSize(int w, int h) {}
    void SetCameraPosition(double x, double y, double z) {}
    void SetLookAt(double x, double y, double z) {}
    void Render() { std::cout << "User Render" << std::endl; }
    static IRenderer *Create() { return new UserRenderer(); }
};
int main(int, char **)
{
    // register a new renderer
    RendererFactory::RegisterRenderer("user", UserRenderer::Create);
    // create an instance of our new renderer
    IRenderer *r = RendererFactory::CreateRenderer("user");
    r->Render();
    delete r;
    return 0;
}
In the above example, the function Create() is used for the callback which return an object. This function is a free function but could also be added as a pure virtual method on the IRenderer abstract base class.
The last point to be noted is that built-in renderers provided in the API do not have to expose themself to the RegisterRenderer() at run time. These can still be hidden either by registering them within the API initialization routine or by using a hybrid of the simple factory and the extensible factory. However, the factory needs to check the type string to be duplicate against built-in names and not be added before by the user.
API Wrapping patterns
Wring a wrapper interface that sits on top of another set of classes is a relatively common API design task.
For example, some common use cases:
- You are working with a large legacy code base rather than rearchitecting all of that code, you decide to design a new cleaner PAI that hides the underlying legacy code.
- You have a C++ API and need to expose a plain C interface for certain clients.
- You have a third-party library dependency that you want your clients to be able to access but you don’t want to expose that library directly to them.
Even wrapper API could face some potential performance hit but it often worth the cost in order to expose a higher-quality or more focused API.
There are several structural design patterns dealing with the task of wrapping one interface on top of another. However, this section will focus on three of these patterns: Proxy, Adapter and Façade.
The Proxy Pattern
The Proxy design pattern provides a one-to-one forwarding interface to another class.

Use cases of Proxy pattern:
-
Implement lazy instantiation of the Original object.
-
Implement access control to the Original object: for instance, you need to check the permission before the user can actually call a certain method.
-
Support debug or “dry run” modes: This lets you insert debugging statements.
-
Make the
Originalclass be thread safe: this can be done by adding mutex locking to the relevant methods that are not thread safe. This is not the most efficient way but it could be useful if you cannot modifyOriginal. -
Support resource sharing: You could have multiple
Proxyobjects share the same underlyingOriginalclass. -
Protect against future changes in the
Originalclass: in this case, you anticipate that a dependent library will change in the future so you create a proxy wrapper around that API that directly mimics the current behaviour.
The Proxy could be implemented as simple as follows:
class Proxy
{
public:
    Proxy() : mOrig(new Original())
    {}
    ~Proxy()
    {
        delete mOrig;
    }
    bool DoSomething(int value)
    {
        return mOrig->DoSomething(value);
    }
private:
    Proxy(const Proxy &);
    const Proxy &operator =(const Proxy &);
    Original *mOrig;
};
Alternatively, this approach can be augmented by using an abstract interface that is shared by both the proxy and origianal APIs. This is done to try and better keep the two APIs synchronzied, although it requires you to be able to modify the original API.
class IOriginal
{
    public:
    virtual bool DoSomething(int value) = 0;
};

class Original : public IOriginal
{
public:
    bool DoSomething(int value);
};


class Proxy : public IOriginal
{
public:
    Proxy() : mOrig(new Original())
    {}
    ~Proxy()
    {
        delete mOrig;
    }
    bool DoSomething(int value)
    {
        return mOrig->DoSomething(value);
    }

private:
    Proxy(const Proxy &);
    const Proxy &operator =(const Proxy &);
    Original *mOrig;
};
The Adapter pattern
The Adapter design pattern translates the interface for one class into a compatible but different interface. This is therefore similar to the Proxy pattern in that it’s a single-component wrapper. However, the interface for the adapter class and the original class may be different.

Some benefits of the adapter pattern for API:
-
Enforce the consistency across your API.
-
Wrap a dependent library of your API.
-
Transform data types.
-
Expose a different calling convention for your API: for example, C++ adapter for a plain C API.
The Façade Pattern
The Façade design pattern presents a simplified interface for a larger collection of classes. In effect, it defines a higher-level interface that makes the underlying subsystem easier to use.
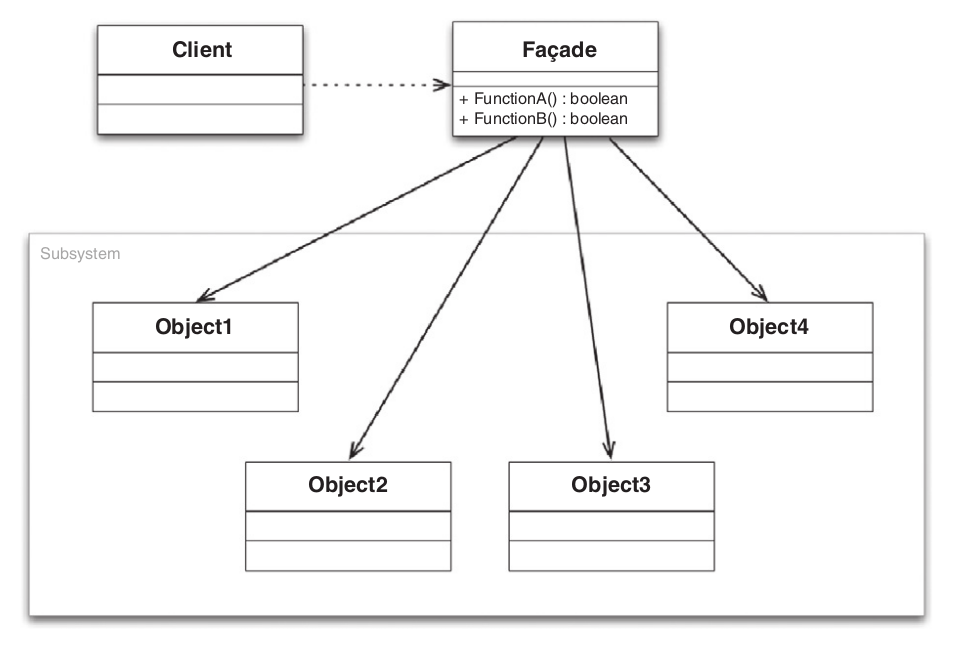
A Façade provides a simplified interface to a collection of other classes. In an encapsulating façade, the underlying classes are not accessible.
There are various useful applications of the Façade pattern in terms of API design:
-
Hide legacy code.
-
Create convenience APIs.
-
Support reduced- or alternate-functionality APIs.
Observer pattern
It’s very common for objects to call methods in other objects. For example, if an object A wants to call a method of object B, A.cpp must include B.h. This could introduce a compile-time dependency and make both class A and B become tightly coupled.Additionally, The generality of A is reduced since it cannot be reused by another system without also pulling in class B.
An Observer lets you decouple components and avoid cyclic dependencies.
The Observer pattern is a specific instance of the Publish/Subscribe, or pub/sub, paradigm. These techniques define a one-to-many dependency between objects such that a publisher object can notify all subscribed objects of any state changes without depending on them directly.
To implement the observer, there are two concepts to know: the subject and the observer (also referred to as the publisher adn subscriber). One or more observers register interest in the subject, and then the subject notifies all registered observers of any state changes.
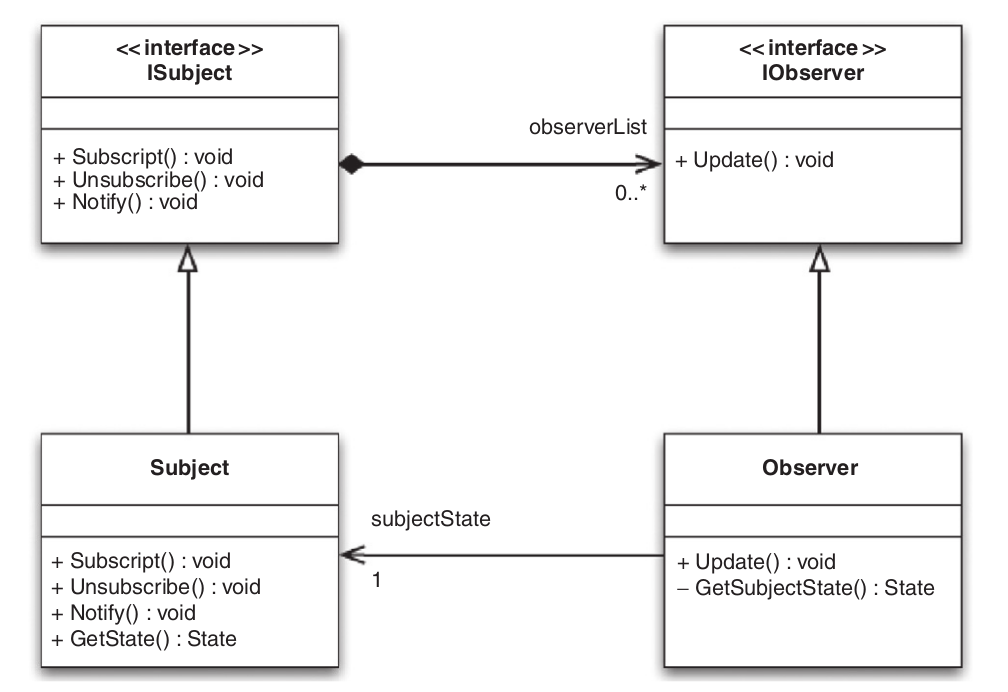
#include <map>
#include <vector>

class IObserver
{
public:
    virtual ~IObserver() {}
    virtual void Update(int message) = 0;
};

class ISubject
{
public:
    ISubject();
    virtual ~ISubject();
    virtual void Subscribe(int message, IObserver *observer);
    virtual void Unsubscribe(int message, IObserver *observer);
    virtual void Notify(int message);

private:
    typedef std::vector<IObserver *> ObserverList;
    typedef std::map<int, ObserverList> ObserverMap;
    ObserverMap mObservers;
};
In the above design, the subject can register and emit notifications for multiple different message types. Each observer could subscribe to one type of messages that they are interested in.
Example for defining the subject class:
// subject.h

#include "observer.h"

class MySubject : public ISubject
{
public:
    enum Messages { ADD, REMOVE };
};
The observer could be implemented with the Update() method which will be call by the subject’s Notify() method.
#include "subject.h"
#include <iostream>

class MyObserver : public IObserver
{
public:
    explicit MyObserver(const std::string &str) :
        mName(str)
    {}
    void Update(int message)
    {
        std::cout << mName << " Received message ";
        std::cout << message << std::endl;
    }

private:
    std::string mName;
};

int main(int, char **)
{
    MyObserver observer1("observer1");
    MyObserver observer2("observer2");
    MyObserver observer3("observer3");
    MySubject subject;

    subject.Subscribe(MySubject::ADD, &observer1);
    subject.Subscribe(MySubject::ADD, &observer2);
    subject.Subscribe(MySubject::REMOVE, &observer2);
    subject.Subscribe(MySubject::REMOVE, &observer3);

    subject.Notify(MySubject::ADD);
    subject.Notify(MySubject::REMOVE);
    return 0;
}
The above example demonstrates clearly the mechanism of how a subject could notify multiple observers when an event happen. The important point to note is that the MySubject class has no compile-time dependency on the MyObserver class. The relationship between the two classes is dynamically created at run time.
The last thing to note is that you must take care to unsubscribe any observers before you destroy them otherwise the next notification could cause a crash.
Comments